
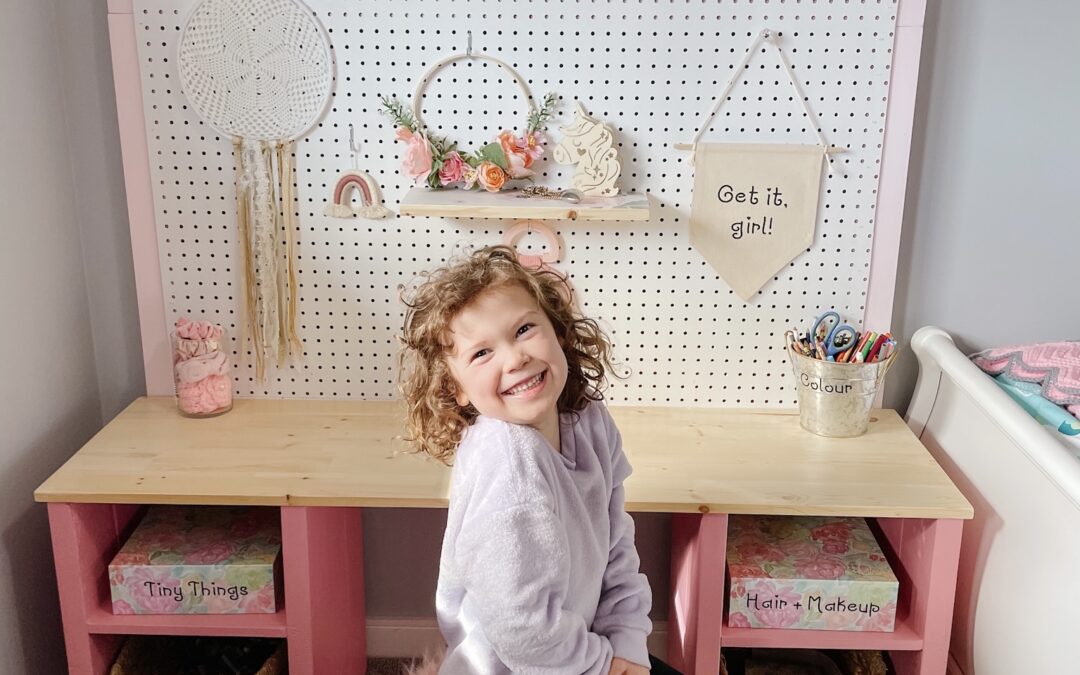
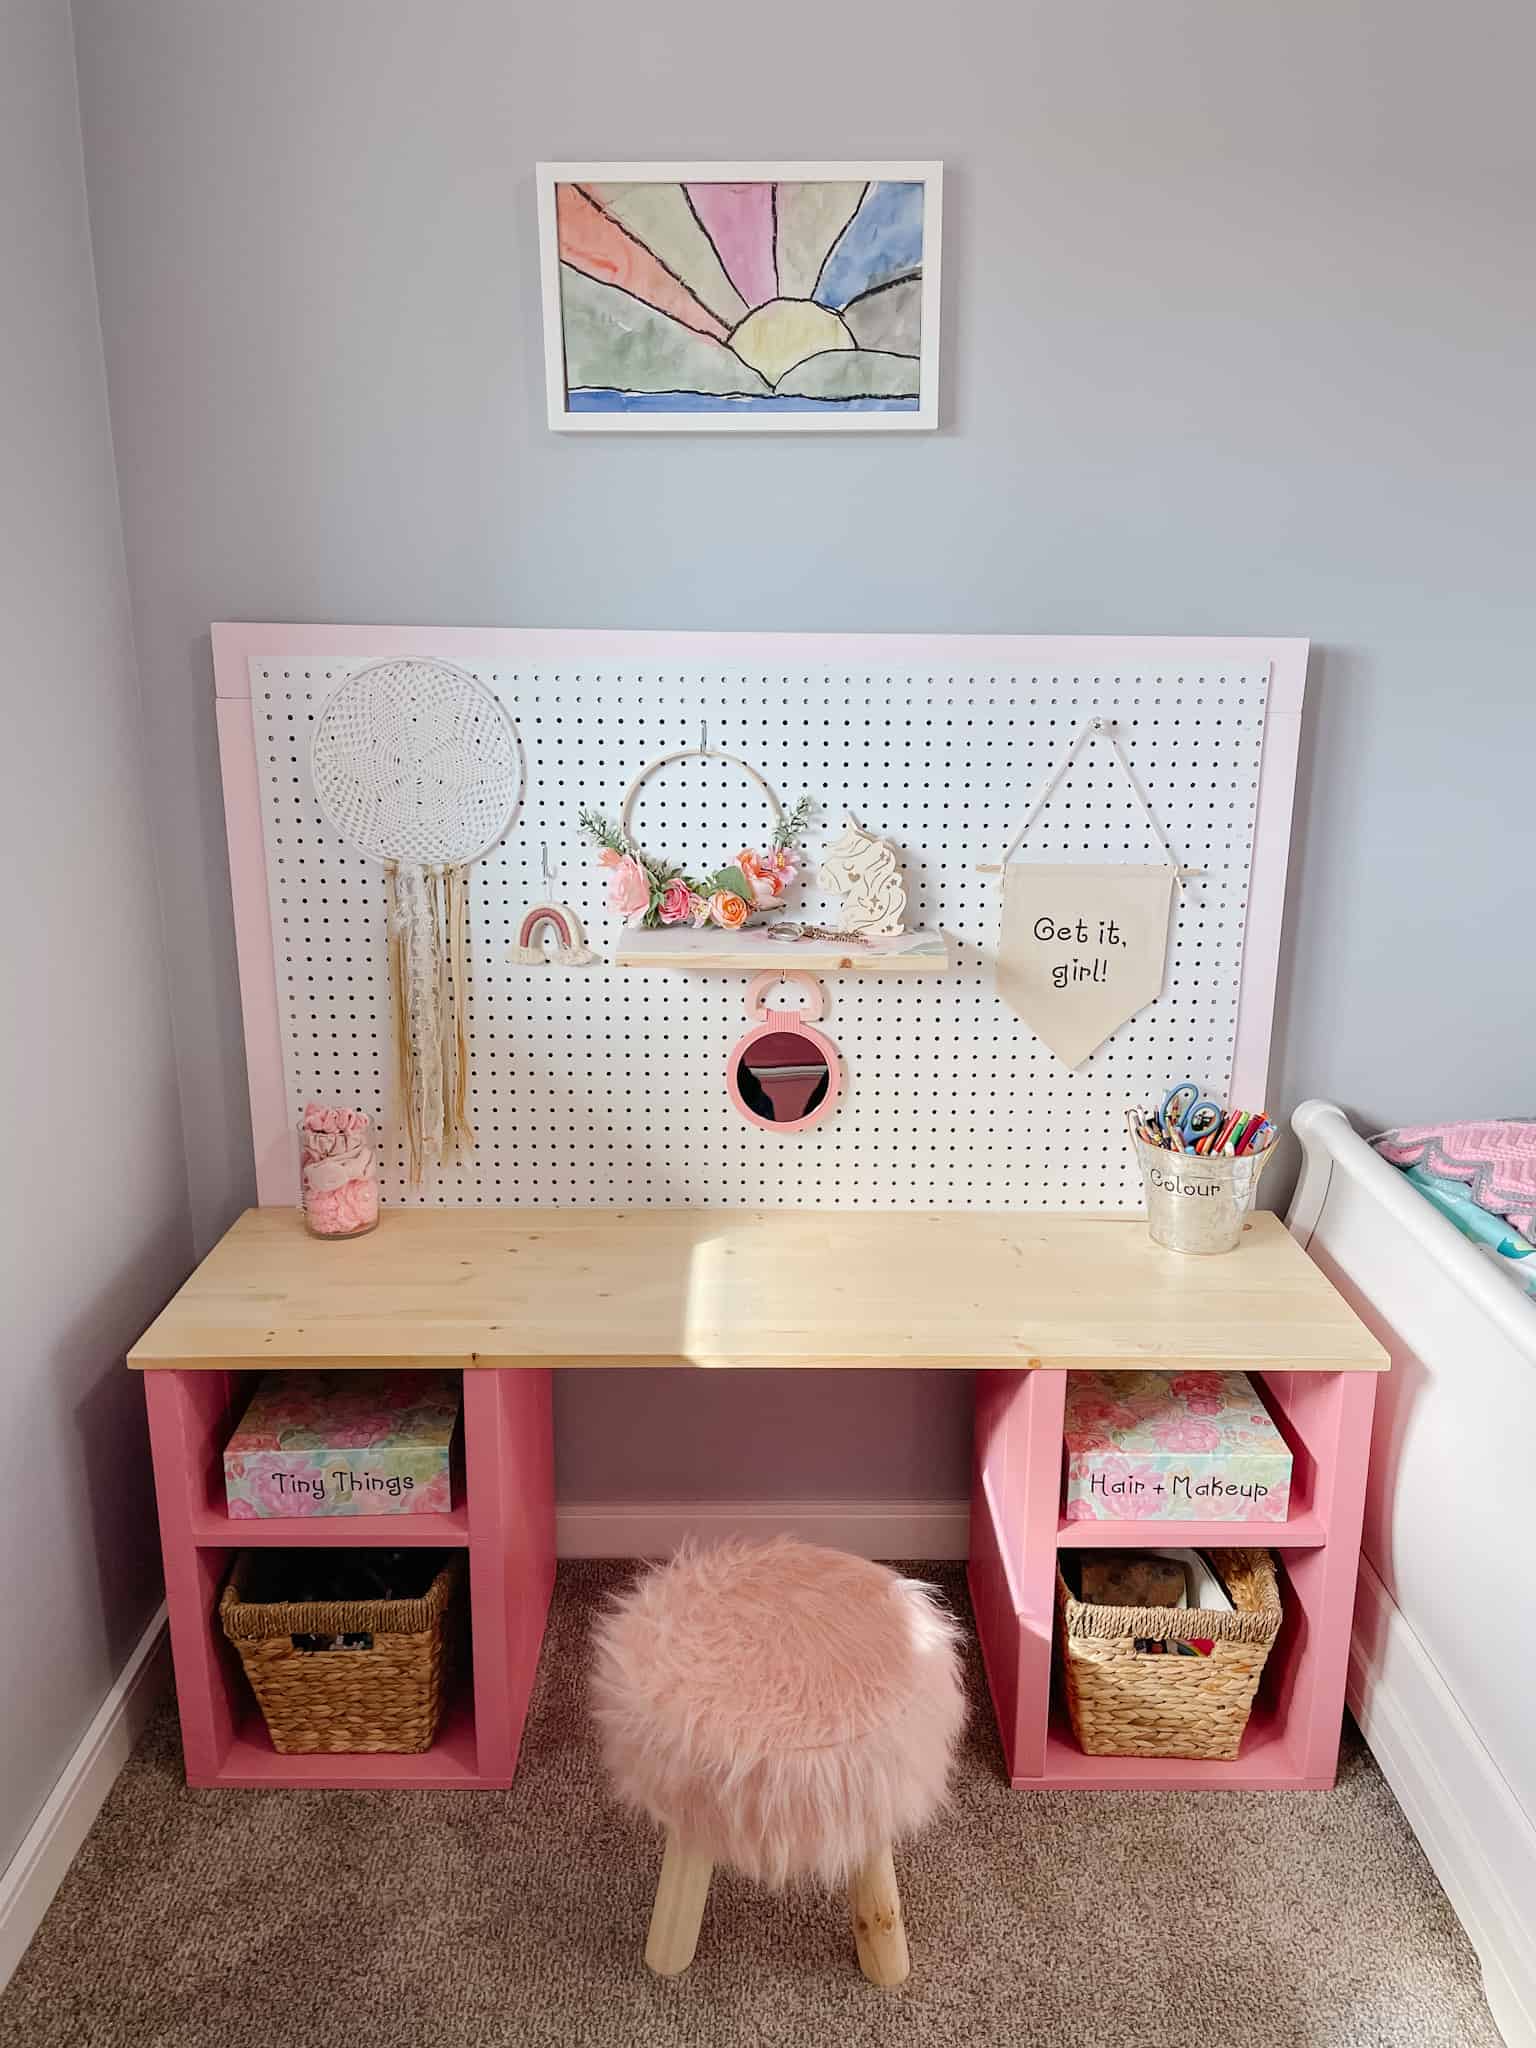
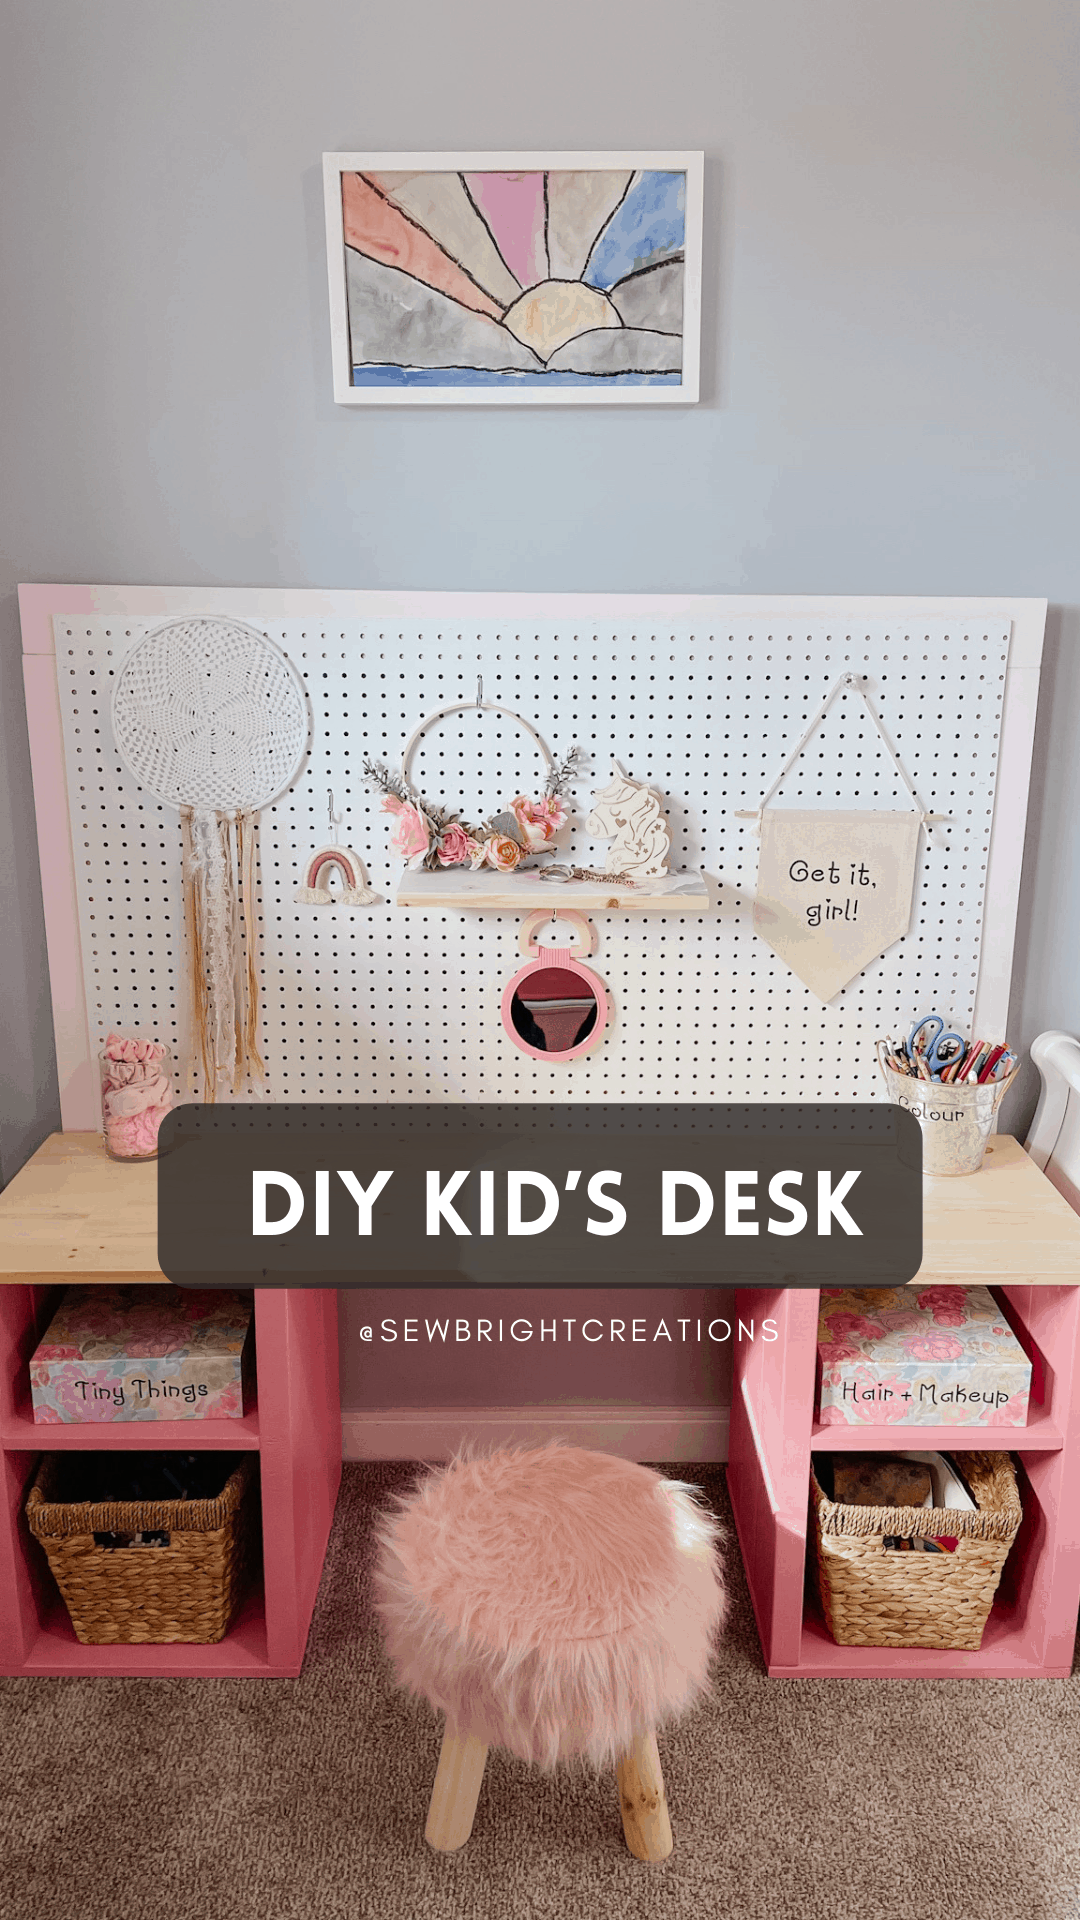
If you have older children and a baby you know the struggle of trying to keep all the tiny things away from the baby! In an effort to make this a little more fun for our oldest, I decided (last minute) to build her a desk in her room! The plan being that ALL the tiny things would remain in her bedroom and her desk would be the storage spot for them. I wanted a simple design, something I could do myself (because Mr. Sew Bright was not home at the time) and something that could be done in a weekend as I had other things planned for the coming week! I checked out a few designs on Pinterest and put them together to make this one!
I wasn’t planning on blogging about the desk, buuuut you all loved it so much and asked how to make it, so here we are. Since this wasn’t planned, I didn’t take a lot of photos during the process so I also made a YouTube video to better explain a few things. Make sure to watch it, it is linked further in this post and will hopefully give you a good visual of what I did.
Enough of that, let’s get going!
Supplies – Wood
Other than the 1×4 I used things I had at home, but if you are buying all new, this is what you’ll need:
1×4 for frame around peg board and back support:
Cut lengths: 52.5″, 35″ x 2 for the sides and 45.5″ for the back (I did not sand or paint the back piece)| total length: 168″ or 14 ft | If you are buying 8 ft lengths you’ll need 2 boards.
2×6 for legs:
Cut lengths 21″ x 12 | total length: 252″ or 21 ft | If you are buying 8 ft lengths you’ll need 3 boards (you’ll get 4 pieces per board).
NOTE: I had to rip 4 of the 2×6’s to make them thinner because the total width of the legs had to match the pine shelving (desk top), which was 16″. I cut them to be approximately 4.75″ wide, which was slightly small, but it all worked out. I made sure the front was flush and you can’t tell the back wasn’t.
Pine shelving for desktop and shelves:
Width for all pine shelving used for the desk is 16″.
Cut lengths: 54″, 12″ x 2, 15″ x 2 | total length: 108″ or 9 ft
Peg board for back:
Cut size: 49″ x 28.25″
(I had a scrap piece so I don’t know what size the sheets come in at the hardware store. You should be able to get this at any building supplies store, Home Depot, Rona, Lowes, etc.).
Supplies – Other
- Latex paint, colour of choice. If you are looking for a small amount, try the Benjamin Moore sample colours, this is what I used for the light pink because I only needed a small amount. I had the darker pink left over from my daughter’s dresser makeover.
- Paintable Caulking
- Paint Brushes
- Foam Roller
- Varathane – water clean up. I used satin, indoor clear Varathane.
- Wood glue
- Brad Nailer and nails
- Staple gun and staples
- Sander and sand paper – 150 grit or so
- Peg board hangers: I just used a few from my sewing room, but I linked a good deal on some at the end of this post.
- I’ve gone into a bit more detail about the steps in the video (click on it below), but basically I cut all the wood, sanded with the orbital sander and 150 grit sandpaper, wiped clean with a damp rag, then painted. I did all the 2x6s and shelves dark pink, the desk top with water based indoor satin varathane, the peg board white and the 1×4 light pink. I used a brush for everything except the peg board I used a foam roller and a foam roller for the second coat of all the paint.
- Next I assembled the legs. This was a bit tricky. I glued and nailed the bottom shelf to the 2x6s upside down. I did both sides of the legs, then added the shelf in about 8″ from the top of where the desk board would go. I glued and nailed this too. Apply the glue very thinly and spread evenly.
- Once the legs were assembled I added the 1x4s, however I think I would recommend adding the top desk board next so it is more sturdy. I also had to take the 1×4 off after to adjust it. BUT before you add the top desk board, caulk the shelving cracks and do a second coat of paint. I show you where I did the caulking better in the video. This really made it look cleaner.
- So now you’ve got 2 coats of paint on the legs dry, 2 coats of varathane on the desktop, you can put it together. Glue and nail the top onto the legs leaving a very small overhang at the front and sides. I did this to hide the imperfections in my cutting on the other boards. It made it look so much better.
- Next you’re going to add the 1×4 frame. Add the sides first, then top board with metal brackets on the top corners. If you had a kreg jig it would be awesome for the top corners, but I don’t have one (it’s on my list!). I screwed the 1×4 frame on with two screws into the back of the 2×6. It goes down about 9″ from the top of the desktop toward the bottom (you’ll see what I mean in the video).
- Once the frame is up, put it on its back and staple and glue the peg board to the 1×4 frame, leaving a bit of the 1×4 exposed as shown in the photos (this will naturally happen if you’ve cut it to the measurements I’ve suggested).
- Put the desk up and glue and nail the last 1×4 piece onto the back for added support. It will be nailed into the edge of the desk top board, from the back, then caulk the front where the peg board meets the desk top. Again, I show all these things in the video.
- Now the fun part, decorate!! I made the wreath from faux florals and a wooden ring. I am always thrifting faux florals and keep a stash at home so I had some handy for this! I also made a cute shelf, dreamcatcher and banner sign (coming to my shop soon!). For the dream catcher, I used a doily that my Gramma crocheted and some of the lace is from my mom’s wedding dress; it’s extra special. Baskets were from another room in the house, the cute floral boxes are from Michaels that I bought on sale years ago and I used my Cricut to make matching labels for everything!
FINISHED –
Whatcha think? Let me know in the comments!

Shop this post …
Sharing links to the supplies and items I could find!


Click HERE for more of my Amazon Favourites!


This is so cute! One day when we have a bigger house I want to do something like this for my daughter 🙂
Thanks! I’m sure she’ll love it when you do!