
This post is not sponsored however some links may be affiliate, which means I may earn a small commission if you shop using the links. There is NO extra cost to you. The opinions and photos are of Sew Bright Creation’s.
You know what has made my DIY projects so much less stressful? An organized workshop! I have saved so much time searching for things, money from buying things we already had, but couldn’t find and really, I’ve saved my sanity from being frustrated time and time again looking for the same thing.
Last spring we renovated our workshop room, and that we’ve been using the room for almost a year, I can confidently share the following tool organization solutions, that work and the majority are very budget friendly! Yes there are a few splurges, but they were all worth it!
My biggest tip when you are organizing your workshop (or any space) is to use what you have and make sure it works! Worry less about it being “pretty” and more about how functional it is. At the end of the day, if it doesn’t work it won’t look pretty because nothing will be put back. Tidy is pretty, so just make sure it works!
Before Photos
These two photos really explain WHY we needed to organize our workshop.


1. Screw Drivers: Workshop Organization on a Budget
A 2×2 or 2×3 would be perfect for this one. I used a scrap piece of barn wood that had been ripped. Make what you have work, just drill holes large enough for your screwdrivers to go in, but not too big that they go all the way through.


2. Drill Bits: Workshop Organization on a Budget
A 4×4 or any chunk of wood works for this drill bit organization. Drill the holes (one size up) for each one drill bit! I like having the drill bits displayed like this because it’s easy to see them, easy to put back and they are all organized by size.

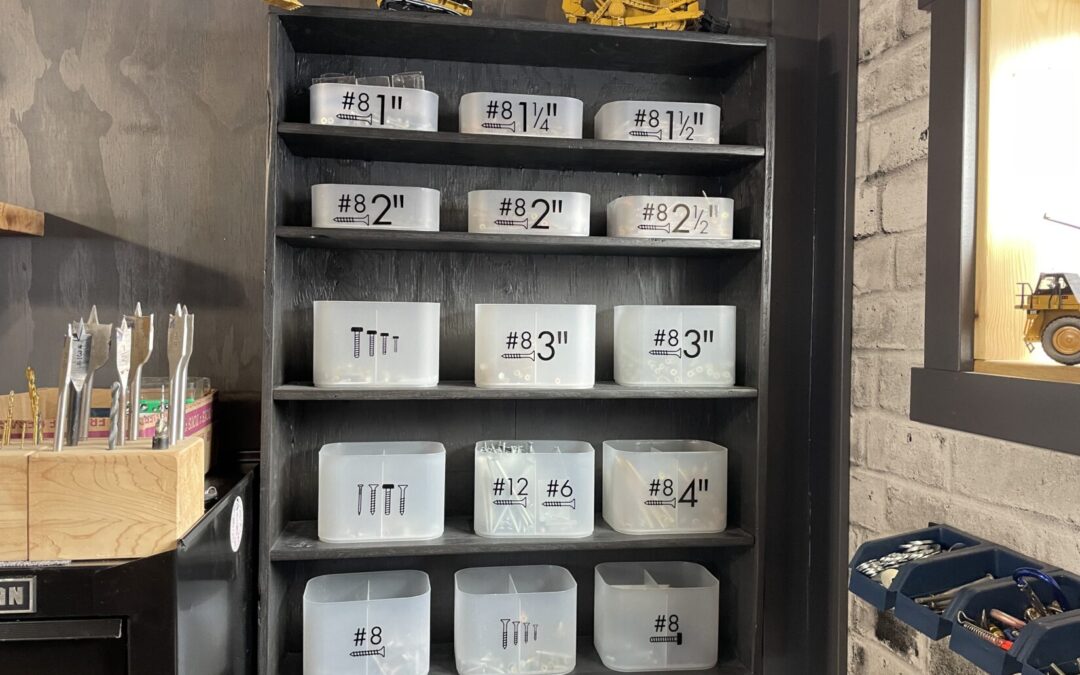
3. Screw Organization: Workshop Organization on a Budget
This one took a bit more time, but was SO WORTH IT! We have saved so much money buying our screws in bulk vs the small plastic boxes and it makes projects run a lot smoother when we can easily find the size and type we are looking for.
Are you ready to get your screws organized like this? Grab our cutting file HERE and make your own labels! I used containers from the dollar store and scrap plywood for the shelf. I made the shelf custom for the containers, but again, use what you have or have access to!


4. Caulking & Paint: Workshop Organization on a Budget
I don’t have a good tutorial on how I made the caulking/spray paint shelf, I just kept trying different angles until I got it right! I used scrap wood to build it and secured it together with screws. This is SUCH A SPACE SAVER! I have so much caulking I could actually use another one! We are good friends with DAP 🙂
The paint cans are stored on shelf made with scrap wood too. You get the idea, use what you have and make sure everything has a place. I always work hard to prevent stacking on top of each other and shelves where things can be hidden behind each other.
Learn more about caulking in THIS VIDEO.


5. Building Supplies: Workshop Organization on a Budget
I used scrapped plywood and other wood to make wood crates. You can buy crates, but I like that these ones are heavy duty and strong for holding building supplies. I used a torch to wood burn them and then made a stencil with my Cricut and painted the labels. They are great for storing groups of things, electrical, paint, hardware, rags, sanding supplies, etc.
Click HERE to see how I build the boxes.

6. Garage Royalty CrownWall: Workshop Organization on a Budget
This is the second CrownWall we have in our house, both were gifted to us and I can honestly say I love them BOTH! The other one is in my craft room and it’s one of the few areas of my craft room that STAYS ORGANIZED! So although I didn’t have to buy them, I definitely recommend them! They are super durable, I love that they are functional, look nice and are VERY good quality. Often peg board type organization systems are of lesser quality, but this one is not. Click HERE to learn more about Garage Royalty.

7. Tools: Workshop Organization on a Budget
Our CRAFTSMAN tool chest is the most recent addition to our workshop storage solutions and it was much needed! I used my Cricut to make labels for the drawers so that everyone knows what’s inside! We also made a plywood box for the base and added the wheels from the tool chest to the plywood base. It works perfect to store our CRAFTSMAN tools totes too!
Note: there is a top part to the tool chest, however I picked this one because I liked the bigger drawers for the type of tools we needed storage for.


What’s next? Follow @sewbrightcreations to find out!!
Any questions! Let me know in the comments!
We would love to see your projects! Please share with us by tagging us on Instagram @sewbrightcreations or email them to [email protected].
Click HERE for my Amazon Favourites!


