
It’s week 6 of the One Room Challenge and my DIY Built In Arch Shelf dreams came true! Keep reading below for a step by step tutorial to see how we converted a rectangular built in shelf into an arch, the easy way!
FYI, ORC = One Room Challenge, you’ll see this acronym a lot over the next 8 weeks!
Click HERE for a recap of the Spring 2022 ORC Workshop Renovation and HERE for a recap of the Fall 2022 ORC Basement Living Room Renovation.
First, let’s talk about what the One Room Challenge is. Have you heard of it? It’s a biannual event that is held every spring and fall. Anyone with a blog, Instagram or TikTok account is welcome to join the fun. It goes over 8 weeks and each week you share an update on on our room. It’s a fun way to connect with other like minded people and be able to encourage each other through all the ups and downs of renovating! I highly encourage you to check out all the other participants HERE.

DIY Built in Arch Shelf
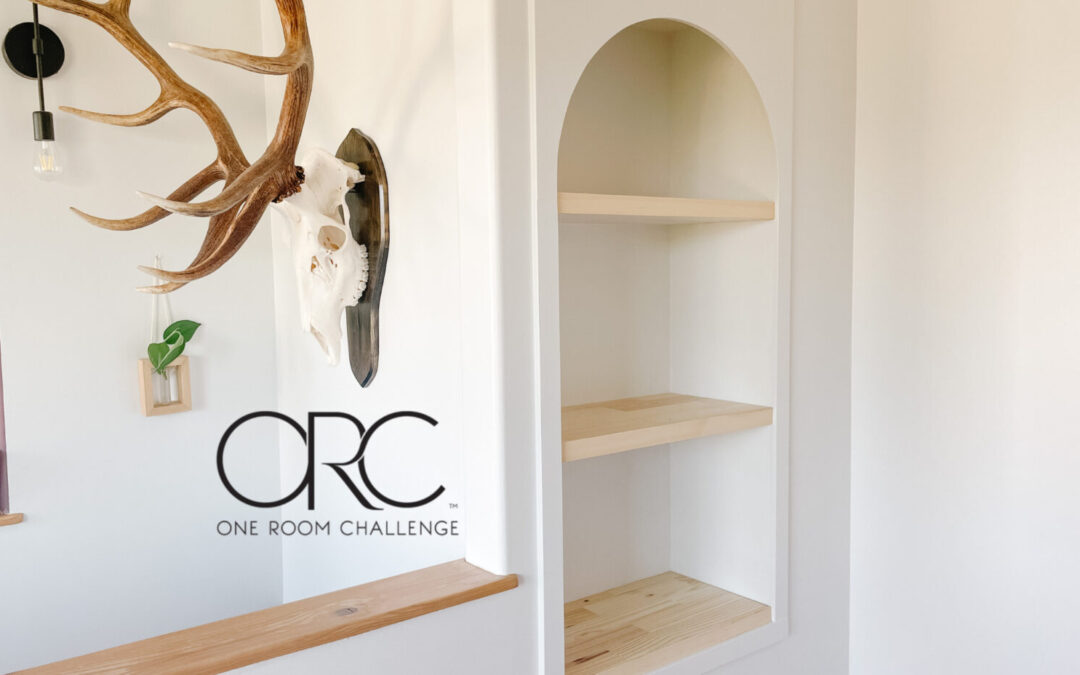
Here’s a recap of where we started. We had an existing build in rectangular shelf, we removed it, sanded, primed and painted it white. Next we converted it into an arch shelf.


DIY Built in Arch – the shelves
My goal was to use as much as the existing cabinet as possible, so for shelves I sanded pine shelving, applied clear satin Varathane, cut it to length and attached it to the top of each existing shelf using wood glue and a couple brand nails. Don’t worry, they aren’t done, but before we finished the fronts we needed to add the arch shape. One 16 x 96″ pine shelving board was $44. All the cost details are shared below.
NOTE: there is a small gap between the cabinet edge and shelf. When we screwed the cabinet to the studs it separated slightly because we didn’t have spacers in. Next time, insert spacers between the cabinet and wall to prevent this.


DIY Built in Arch – the arch
The first thing I did was place tape around the edge of cabinet to determine the size. I wanted it big enough to cover the join between the wall and the cabinet and have a very slight overhang on the inside edge too. This helps to cover any imperfections.
Once I figured out the total size, I cut an arch shape using a piece of cardboard. For the arch, I measured the centre at the top and bottom and drew a vertical line. Next I measured the distance from each edge (right and left) to the inside, for how thick I wanted it to be. The measurement from the centre to the inside edge of the trim was the measurement used for the arch. We drilled two small holes in the thin strip of wood, this distance apart. We nailed one end in the centre and placed the pencil in the other end to draw all the way around. We cut out the cardboard and were happy with the shape so I repeated the above steps with the MDF.
I chose to use MDF 5/8″ instead of wood for the arch and trim because MDF is smooth on all edges. If I used wood I would have need some wood filler or edge banding to make the edges smooth how I wanted. MDF was only available in full sheets 4×8 feet so we have lots left over. We paid $72 for the sheet. All the costs for this built in arch shelf are shared below.
I used a jig saw to cut the arch shape and sanded all edges with 220 grit and an orbital sander. Sanding makes a BIG difference, don’t skip this step!
I primed and painted white (one coat) of the arch before putting it up.


DIY Built in Arch – the trim
The arch was secured using a Brad Nailer and level. Then we ripped strips of MDF for the sides and bottom edge, the same width as the bottom of the arch sides. Each piece of MDF was primed and painted with one coat of white paint before installing with the Brad Nailer.
Once all trim was installed, I used Alex Flex Caulking by DAP to caulk along the outside edge. After it was dry I painted all the trim and arch one more coat of white paint.
For the shelf trim I ripped strips of wood from a 2×6 (a 2×4 would work too) about 1/8″ wide, sanded, wiped clean and covered in clear satin Varathane to match the pine shelving. I didn’t want any nail holes showing on the fronts so I applied the strips using wood glue and held them in place using painters tape. They fit tight, so it was easy to hold them in place while they dried overnight.


DIY Built in Arch – complete!
I’m so excited how this DIY Built In Arch Shelf turned out! What do you think? Keep following along to see how I give the office door a refresh next week!


What is this office renovation costing?
I’m talking about the thing that everyone shys away from. WHY? Because its a HUGE part of renovating! I don’t want to paint an unrealistic picture for you so I’m sharing the cost breakdown as I work through this renovation. If you follow on Instagram, you’ll find the cost breakdown in the caption of my reels and posts. If I’m missing something, just ask!
Here’s what I bought this week:
$72 MDF 5/8″
$44 Pine shelving
Carry over from previous weeks $41.44 (rounding to $42)
TOTAL SPENT on this office renovation: $158
Click the video below for a full recap!
Keep following along to see where we get to next week! I’mhopefuly that I’ll finis the arch shelf!
Before Photos of our office
PROJECT GOAL: Make this space bright, neutral and functional so I actually want to do my office work … do you think that’s possible? lol


Here’s the plan for our Office One Room Challenge
Planning isn’t my strong suit, but I’m working on it!
- Week 1: Plan >> Click HERE for the first post.
- Week 2: Paint prep, there’s a lot. Fill holes and there’s a lot of work to do around the window sills >> MOSTLY DONE Click HERE for the video.
- Week 3: Prime and paint walls Click here for the video.
- Week 4: Window casings & blinds >> Didn’t quite get there, but click HERE to see what I did instead.
- Week 5: Work on arch >> Click here for the details.
- Week 6: Finished the arch shelf!
- Week 7: Set up desk and add shelving >> Desk is up, but I’m going to work on the door and window trim
- Week 8: Touch ups, decor and reveal!!
For daily progress, follow along on Instagram.
Click the video if you’re a visual learner!
Any questions! Let me know in the comments!
We would love to see your projects! Please share with us by tagging us on Instagram @sewbrightcreations or email them to [email protected].
This post is not sponsored however some links may be affiliate, which means I may earn a small commission if you shop using the links. There is NO extra cost to you. The opinions and photos are of Sew Bright Creation’s.


