
One of the most beloved spring celebrations is Easter, a time for renewal and new beginnings. If you’re looking to get creative and add some festive flair to your home this Easter season, why not try your hand at some fun and easy Easter crafts?
From colourful Easter egg garlands to adorable bunny-themed decorations, there are endless possibilities for DIY projects that will brighten up your space and bring a touch of springtime cheer. Whether you’re crafting with kids or looking for some solo creative time, these Easter craft ideas are sure to inspire you to get into the holiday spirit.
So gather your crafting supplies, put on your favorite springtime playlist, and lets get creative together. Happy crafting and happy Easter!
Click the link below each craft for a short video tutorial.
1. Flower Painted Candles
This craft has been so popular on my Instagram, it’s quick, easy, adorable and perfect for Easter or Spring table decor. This would be a fun project to do with friends, at a party, ladies night or solo with a good glass of wine or hot coffee!
For these flower painted candles you’ll need:
- candles (I tried beeswax this time and love how they turned out)
- Crayola crayons
- fine tip paint brush
- paper towel or rag
- small tinfoil trays or line a muffin tin with tinfoil
How to make flower painted candles:
- Soak crayons in water then set aside. Use cold water otherwise the crayons may melt.
- Line a muffin tin with tinfoil, or use mini tinfoil pie plates. You could use silicone muffin liners, but a wax residue will be left so I wouldn’t reuse them for food.
- Peel your crayons, wipe dry and place in the muffin tin. One colour per muffin spot.
- Place in oven and heat at 350 degrees C until melted and hot. You want to make sure the wax is very hot, not just melted.
- Dip your fine tip brush into the hot wax and use simple brush strokes to paint a flower shape on the candle. The wax dries VERY quickly. I found it easier to keep the wax in the toaster oven (with the door open) and work right beside it. After the flower base is dry (it only takes a few minutes), then dab a dot of melted yellow crayon in the centre to complete the daisy design on your candlestick. Note: If you try to paint over top the wax will clump very quickly.
- Rotate your candle and continue with the daisies. You can do any shape or design. Multi-coloured, ombre or one colour like I did. Show us what you create by tagging @sewbrightcreations on any social media channels!


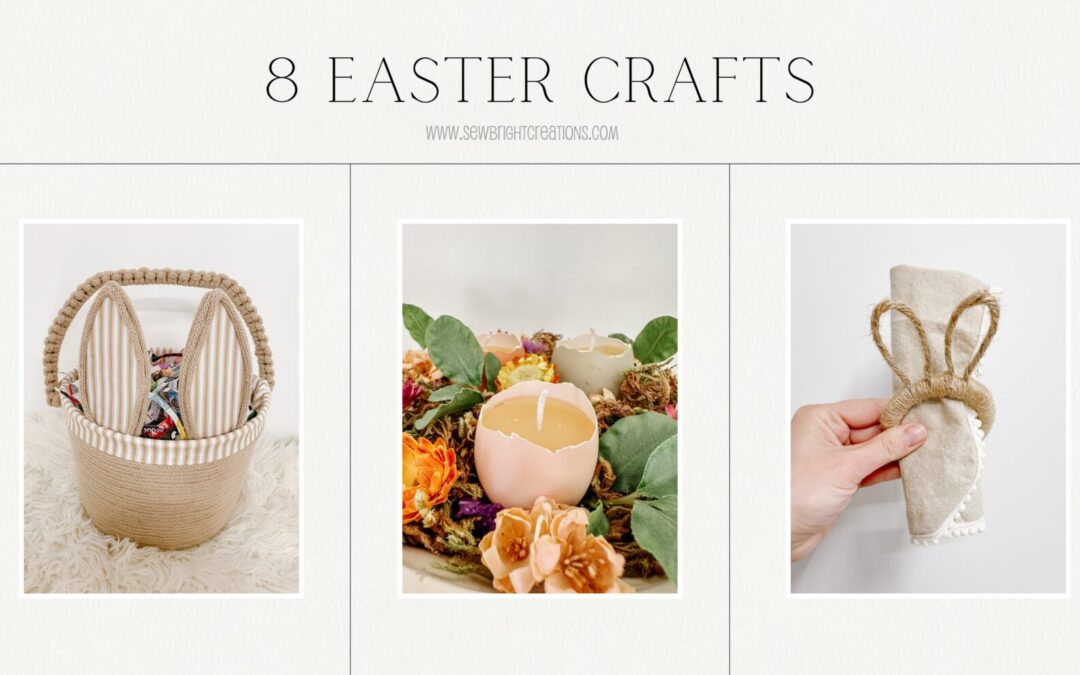
2. DIY Bunny Napkin Rings
Creating Easter bunny napkin rings can be a fun and festive craft to add a touch of charm to your Easter table setting. Click the link below for a video tutorial on how you can easily make these adorable bunny napkin rings.
For these adorable bunny napkin rings you’ll need:
- round shower curtain hooks (mine were thrifted)
- jute
- jute wire
- hot glue
How to make bunny napkin rings:
- Bend the wire jute into bunny ear shapes and hot glue to the top of the shower curtain ring.
- Wrap jute around and ring. Secure it with hot glue at the beginning, middle and end to ensure the jute stays tightly wrapped.
- Repeat to make additional bunny napkin rings. Trace the wire jute on top of the existing bunny ears to keep the size and shape similar.
- Place your favourite napkins inside and you’ve got charming decor that will surely impress your guests and add a personal touch to your Easter table decor. Show us what you create by tagging @sewbrightcreations on any social media channel!


3. Crystallized Easter Eggs
Crystallized Easter eggs are a fun and creative way to decorate eggs for the Easter holiday without sacrificing real eggs. To make crystallized Easter eggs, you will need borax and egg shells from already used eggs. I did try to make these with plastic Easter eggs but had a hard time getting them not to float and the crystals also didn’t stay on the smooth plastic surface.
Keep reading for the full tutorial, or skip ahead to the video link below, if that’s your style.
For this crystallized egg craft you’ll need:
- egg shells (for eggs broken in half)
- fishing line
- borax
- die / food colouring
- sewing pin or needle
How to make crystallized Easter eggs:
- Add borax into water and heat until dissolved. Use a ratio of 1/2 cup borax to 2 cups water.
- While you wait for the borax to completely dissolve, gently poke a hole near the top of each egg shell using a small pin. Tie fishing line through the hole.
- Pour the dissolved borax mixture into a glass jar and add die. I used RIT die that I had at home, but food colouring would also work.
- Place one egg shell in the water so it sinks to the bottom. Place the second egg shell that has the fishing line attached to it, in the water so it is suspended and not touching the sides of the jar or other egg shell. Place a wood skewer over the top and tie the fishing line to it so it keeps the egg shell in place.
- Remove the eggs after 12-24 hours and you’ve got the most beautiful crystallized Easter eggs that can be used in a center piece to add a touch of sparkle to your Easter holiday. Show us what you create by tagging @sewbrightcreations on any social media channel!


4. Easter Bunny Rope Basket from Recycling
The only thing I love more than crafting is crafting with recycled items! I’ve seen these popular rope Easter baskets and absolutely love the look so I made my own, with what I had at home. Here’s how you can make one too:
For this DIY Easter basket you’ll need:
- 4L plastic ice-cream container (empty and clean)
- 5mm braided cord (rope) or macrame cord
- cotton fabric of choice
- cardboard
- hot glue
How to make an Easter bunny rope basket:
- Starting at the bottom of your bucket, use hot glue to secure the braided rope around it. I used 5mm Premium Braided Cord because I had it on hand, but macrame cord or other craft rope from a dollar store would also work.
- Continue wrapping rope all the way around and secure it with a small bead of hot glue as you go. Stop when you are about 1″ from the top.
- Cut 2 pieces of rope slightly longer than the handle and glue it to the handle. Cut another piece of rope, 20″, fold in half and wrap it around the handle using square knots.
- Cut out ears from cardboard and make them pretty using hot glue, fabric and rope. Thrifted fabrics or old sheets would work great for the fabric.
- Use the same fabric to make a lining for the inside of the bucket, then glue it all together and you’ve got a modern Easter bunny basket made from recycling!
- Click HERE for the blog post I wrote from Jan & Jul that includes a more detailed tutorial (with measurements) of these DIY Easter Baskets. Show us what you create by tagging @sewbrightcreations on any social media channel!


5. Easter Egg Candles
Last year I made Easter egg candles with paraffin wax and my daughter and I coloured on the outside. Click HERE to see how cute they turned out. This year I decided to try a more natural version this year.
For these DIY Easter candles you’ll need:
- farm eggs
- beeswax
- candle wick
- toothpick / clothespin
How to make Easter egg candles:
- Melt beeswax in a double boiler. A canning jar in a pot of water on medium heat works great.
- Carefully break a hole at the top of an egg. Pins or the sharp end of corn on the cob holders work well. Remove the egg (keep for scrambled eggs) and rinse the eggshell with water. You can also poke a pinhole in the bottom of the egg and blow the egg out the top.
- Break the top of the eggshell down to about 1-2cm from the top of the egg.
- Place a wick in each eggshell and stabilize it with a toothpick or clothespin across the top edge of the eggshell.
- Pour hot wax into the egg shells, leave a bit of room for topping up evenly. Once solidified, add more melted wax as needed.
- These cute little egg candles make great table decor! Which style do you like better? The white coloured ones or the farm eggs with beeswax? Show us what type of Easter egg candles you create by tagging @sewbrightcreations on any social media channel!


6. Nature Eggs
Making nature eggs cost $0 and is a great activity for getting your little ones outside. While you’re adventuring and gathering, you might as well collect the supplies needed for the next craft: Mini Bird Nests. Here’s how to make nature eggs:
For this nature egg craft you’ll need:
- cardboard (cereal boxes work great)
- nature (pine cones, rocks, leaves, flowers, whatever you can find)
- white or hot glue
- scissors
- jute or string
How to make nature eggs:
- Cut cardboard out into an egg shape and trace it to cut out as many egg shapes as you’d like.
- Go for a nature walk and collect small rocks, leaves, pinecones, twigs, flowers, whatever you can find outside. Bring inside to dry.
- Use glue to secure pieces of nature onto the cardboard in any design or pattern you wish.
- Hot glue the eggs to jute and you now have a cute garland, perfect for the outdoor and nature loving families.
- Show us what you create by tagging @sewbrightcreations on any social media channel!


7. Baby Bird Nest Craft
There’s just something about miniature things, aren’t they cute? This nature inspired craft is also a great ones for kids and large groups. Go for a nature walk to collect the supplies, then get crafting! Here’s how to make this mini bird nest craft:
For this baby bird nest craft you’ll need:
- walnut
- small rocks
- dried grass, old man’s beard, moss or other bird nesting material
- acrylic paint and paint pens
- hot glue
How to make baby bird nests:
- Break or cut walnut in half and remove the insides.
- Place a dab of hot glue in the walnut shell and add old man’s beard, moss or other dried grass on top.
- Paint small rocks white. I love using paint pens, you can view them in my shop HERE, or click HERE if you’re Canadian.
- Splatter darker blue and cream coloured paint onto the rocks and let dry.
- Use hot glue to place them inside the walnut and now you have the cutest mini bird nest!
- I got carried away and also made a mini bunny, chick and I had these ladybug stickers so I used them too. I placed them on top of dried moss in a glass cake dome to make the perfect DIY Easter Center piece!
- Show us what you create by tagging @sewbrightcreations on any social media channel!


8. Re-Useable Easter Eggs
It’s time to ditch the plastic! Make these super easy re-useable fabric Easter Eggs in minutes. Your kids will love them just as much and you will too because they take up way less room to store! I recommend watching the video for this one, click the link below.
For these re-useable Easter eggs you’ll need:
- scrap fabric, I used jeans, but cotton would work too
- embroidery needle
- embroidery thread
- fray check
How to make re-useable fabric Easter eggs:
- Draw an egg shape out of cardboard and use it to trace onto your fabric. For each egg I cut 3 egg shapes.
- One fabric egg shape will be used for the front and the other two will be trimmed for the back. Cut them so they slightly overlap (about an inch) in the middle of the egg (on the backside).
- Dab fray check around ALL cut edges. This will prevent the fabric from fraying. DO NOT SKIP THIS STEP. You will not see the fray check when it dries.
- Embroider any pattern (if desired) onto the fabric egg that is not cut (the front piece).
- Place the fabric pieces on top of each other and use a blanket stitch to join the outside seam. For one of them I used the back jean pocket on the back side, but you don’t have to use this part of the jeans for all the back sides.
- Ditch plastic ester eggs and now you’ve got re-useable Easter eggs to fill for many years to come! I also love that these ones take up way less room than the plastic Easter eggs.
- Let us know if you give this one a try and tag @sewbrightcreations on all social media!


Which Easter craft are you going to try first?
Are you ready to gather your crafting supplies, put on your favorite springtime playlist, and let your creativity soar with these fun Easter craft ideas that will add joy to your home this season? Happy crafting and happy Easter!
I can’t wait to see what you create! Show me on any of my social media channels @sewbrightcreations.
Any questions! Let me know in the comments!
We would love to see your projects! Please share with us by tagging us on Instagram @sewbrightcreations or email them to [email protected].
This post is not sponsored however some links may be affiliate, which means I may earn a small commission if you shop using the links. There is NO extra cost to you. The opinions and photos are of Sew Bright Creation’s.


