
Valentine’s Day is just around the corner, and what better way to show your loved ones how much you care than by making them a thoughtful and heartfelt gift? In this blog post, we will explore some fun and easy Valentine’s Day crafts and DIY projects that are perfect for adults. After all, you’re never too old to craft! These crafts would also be perfect for a Galentine’s celebration.
Click the link below each craft for a short video tutorial.
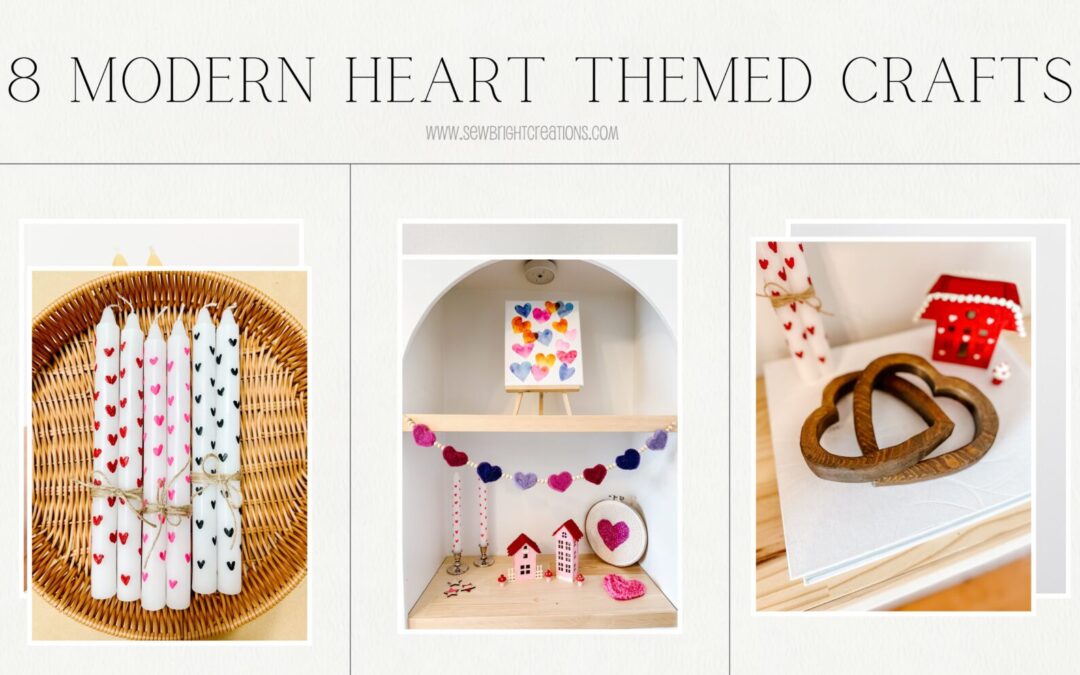
1. Heart Painted Candles
I can see why this craft went viral on my Instagram, it is so cute and easy. This would be a fun project to do with friends, at a party, craft night or for a Galentine’s celebration.
For these heart painted candles you’ll need:
- candles (I prefer straight ones, but you could use tapered)
- Crayola crayons
- fine tip paint brush
- paper towel or rag
- muffin tin + tinfoil
How to make heart painted candles:
- Soak crayons in water then set aside. Use cold water otherwise the crayons may melt. Don’t ask how I know.
- Line a muffin tin with tinfoil. You could use silicone muffin liners, but a wax residue will be left so I wouldn’t reuse them for food.
- Peel your crayons, wipe dry and place in the muffin tin. One colour per muffin spot.
- Place in oven and heat at 350 degrees C until melted and hot. You want to make sure the wax is very hot, not just melted.
- Dip your fine tip brush into the hot wax and use two simple brush strokes to paint a heart shape on the candle. The wax dries VERY quickly so it is best to do only two brush strokes. If you try to paint over top the wax will clump very quickly.
- I reheated the wax about 4 times per candle to ensure it stayed very hot. I’d recommend keeping the wax on a warming plate if you have one or somewhere warm so it says hot longer.
- Rotate your candle and continue with the hearts. You can do any shape or design. Multi-coloured, ombre and one colour like I did. Show us what you create by tagging @sewbrightcreations on any social media channels!


2. Heart Embroidered Sweater
If you’re looking for a really quick craft and something festive to wear in February and this one is for you. I used yarn to embroider a heart on a sweater in about half hour. Once you get the hang of it, it goes quite fast. I recommend watching the video tutorial for this one, click the link below.
For this heart embroidered sweater you’ll need:
- sweater
- darning needle
- yarn
- heart stencil or you can draw by hand
How to make a heart embroidered sweater:
- Print a heart shape on paper to trace on your sweater. I used a white fabric pencil to make the heart.
- Thread yarn through your darning needle. Tie the end in a knot and start from the inside of the sweater and poke through the top centre of the heart. Pull yarn through to the front side of the sweater.
- Make a loop by placing the needle back through the hole you just came through, but don’t tighten. Leave a small loop about the size of a quarter. Your needle should now be on the inside / back of your sweater.
- Poke the needle along the heart drawn line about 1/4″ from the last hole and pull your thread through, on the inside of the loop.
- Repeat this process and tie at the back when done. You can do any shape or design. Writing a name or word would be adorable too. Show us what you create by tagging @sewbrightcreations on any social media channels!


3. Punch Needle Heart Craft
Punch needling is a great craft for sitting on the couch. Once I got into it I found it very relaxing. If you’re new to punch needling, I’d recommend starting out with a kit. I’ve purchased kits on Amazon and Etsy, you can find some linked at the end of this blog post.
Once you have a punch needle kit you can purchase the monk cloth (fabric part), embroidery hoop and yarn separate and create your own designs, like this heart one I did. I was enjoying my craft so much I actually didn’t get very much video, but click below and you can see the basics in how easily it comes together.


4. Painted Heart Door Mat
I’m a sucker for changing my doormat to go with the season. It brings my joy as I step on it every time I leave and enter my house and when you’ve got 2 active children, there’s a lot of coming and going every day. I couldn’t find one I loved, so in true DIY fashion, I decided to paint my own heart door mat. Here’s how you can make one too:
For this painted heart door mat you’ll need:
- blank door mat (I’ve seen these at Home Depot and Ikea, but we don’t have those close so I ordered from Amazon)
- DecoArt Paint, or any acrylic or latex paint
- painters tape + paint brush
- heart stencil from The Cutting Edge Stencils (or draw your own)
- transparent Flex Seal (linked on Amazon)
How to make a painted heart door mat:
- Use painters tape to create lines in the centre so the stencils are even.
- Place stencil between the tape and use a brush to paint over the stencil. It works best if you use a hard brush and push straight down. Repeat for all the hearts, making sure to clean the stencil each time.
- Once dry, repeat until the paint has fully covered. It may take 3-4 coats. Just keep going until you’re happy with how it looks.
- Spray two coats of Flex Seal over the whole mat, letting each coat dry between applications. I recommend doing this outside or in a well ventilated area. Show us what you create by tagging @sewbrightcreations on any social media channels!


5. Heart Embroidered Shoes
I’ve been loving the trend of embroidering on clothing so I decided to try it on shoes. I picked these white shoes up from my local Red Apple store. This craft takes a while, but it’s another great one you can do while on the couch. I recommend watching the video tutorial for this one, click the link below.
For these heart embroidered shoes you’ll need:
- shoes
- embroidery needle
- embroidery floss
- heart stickers
How to make heart embroidered shoes:
- Place heart stickers on your shoes where you want to embroider. I traced them with a pencil at first, but it was hard to remove (dabbing with a wet soapy cloth worked best), then a friend introduced me to these pens where the ink dissapears when heat (blow dryer) is applies. Click here for the pens.
- Seperate the embroidery floss into 3 strands and thread them through the needle. Tie a double or triple knot at the end.
- Start from the inside of the shoe and poke the needle through at top where the heart bumps join. Pull it through and poke the needle to the inside straight down, at the bottom tip of the heart.
- From the inside, poke the needle through on the right side of the first hole. Pull through to the front and poke the needle back to the inside on the left side of the bottom hole. You’ll continue doing this same pattern all the way around the heart. Make sure you are progressing the same distance at the top and bottom to create an even pattern.
- When you are finished, tie a knot on the backside and trim your thread. Repeat for as many hearts as you want.
- Show us what you create by tagging @sewbrightcreations on any social media channels!


Wondering where to get some of these heart craft supplies?
Click HERE to check out my Amazon Store Front.

6. Felted Heart Garland
Needle felting is another one of those very therapeutic crafts (as long as you don’t poke your fingers)! I created several small hearts and put them together to make a garland. Felted shapes also look cute on wood signs for extra depth and interest. Here’s how to make felted hearts:
For this felted heart garland you’ll need:
- wool roving felt
- needle felting needle
- heart cookie cutter
- styrofoam or cork board
- wood beads
- cotton string
How to make a felted heart garland:
- Place the cookie cutter on top of the styrofoam or cork board. Rip off some wool roving and stuff it inside the cookie cutter. It should be slightly over flowing.
- Poke the needle felting needle up and down, all over the wool roving.
- When the shape starts to form, flip it over and poke on the other side. Flip the heart as many times as you need to.
- Keep poking the wool roving down and add more as needed until you have a firm shape. It takes a while so keep going until it is firm enough to keep it’s shape when the cookie cutter is removed.
- Remove the cookie cutter and round out the edges, as needed, using the needle. Repeat for all the hearts.
- To make it into a garland, string cotton thread through a needle and place it through the wood beads and felted hearts in your desired pattern.
- Show us what you create by tagging @sewbrightcreations on any social media channels!


7. Wood Linked Hearts
This heart craft is a little more complex then the ones above, but if you’re good with power tools then I strongly suggest you try it! Here’s how to make these wood linked hearts:
For these wood linked hearts you’ll need:
- 1×6 wood board (I used cedar)
- jigsaw
- heart cookie cutter
- drill and hole saw bits
- dremel with sanding attachment
- stain
- wood glue
- clamps
How to make wood linked hearts:
- Place the cookie cutter on top of the styrofoam or cork board. Rip off some wool roving and stuff it inside the cookie cutter. It should be slightly over flowing.
- Poke the needle felting needle up and down, all over the wool roving.
- When the shape starts to form, flip it over and poke on the other side. Flip the heart as many times as you need to.
- Keep poking the wool roving down and add more as needed until you have a firm shape. It takes a while so keep going until it is firm enough to keep it’s shape when the cookie cutter is removed.
- Remove the cookie cutter and round out the edges, as needed, using the needle. Repeat for all the hearts.
- To make it into a garland, string cotton thread through a needle and place it through the wood beads and felted hearts in your desired pattern.
- Show us what you create by tagging @sewbrightcreations on any social media channels!


8. Birch Heart DIY Air Freshener
This heart craft is great for both adults and kids! If you don’t have easy access to birch rounds and birch bark you could use wood shapes from the Dollar Store. Here’s how to make these non-toxic air fresheners:
For this birch heart air freshener you’ll need:
- birch (or other wood) round
- birch bark
- heart cookie cutter
- wood beads
- jute
- essential oil
- hot glue
- clamps
How to make a birch heart air freshener:
- Place the heart cookie cutter on top of the birch bark, trace it and cut it out.
- Use hot glue to attached it to the wood round. I did one heart and each side.
- Place jute through hole at the top of the wood round (drill a hole if you need to) and thread on two beads, of slightly different sizes. Tie a knot to create a loop for hanging.
- Put a dab of your favourite essential oils on the wood beads and hang in your vehicle or wherever you want an air freshener. I used “Lighten Up” essential oil from Mint Cleaning and I love it! Click HERE to save on your first Mint order, or use code SEWBRIGHT15 to save on your second and third orders.
- Show us what you create by tagging @sewbrightcreations on any social media channels!


Which modern heart themed craft are you going to try first?
I read a quote the other day that said, “the first person you should fall in love with is yourself.” So whether you craft with a group of friends or by yourself, I hope it fills your creative cup, like it does mine because YOU DESERVE IT.
I can’t wait to see what you create! Show me on any of my social media channels @sewbrightcreations.
Any questions! Let me know in the comments!
We would love to see your projects! Please share with us by tagging us on Instagram @sewbrightcreations or email them to [email protected].
This post is not sponsored however some links may be affiliate, which means I may earn a small commission if you shop using the links. There is NO extra cost to you. The opinions and photos are of Sew Bright Creation’s.


